How I manually ship an order through Shipvine Logistics?
Need to ship an order, but don't want to go through an e-commerce system? Or, just ready to ship your first order via Shipvine? We'll walk you through it.




Shipvine Lingo
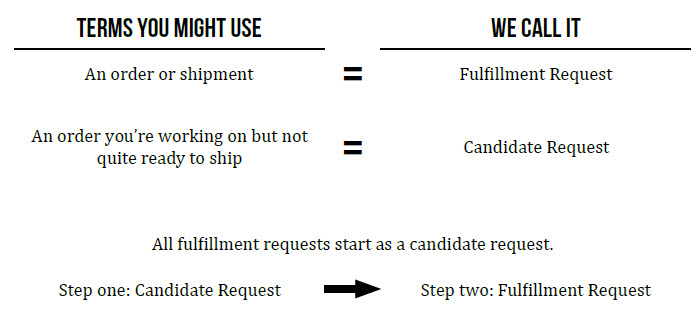
First, let's get some Shipvine lingo out of the way:
(You can read more about fulfillment requests and candidate requests when you're ready for the full details.)
Getting Started
First, go to https://logistics.shipvine.com/ and log into your account. If you have trouble logging in, contact us via support@shipvine.com.
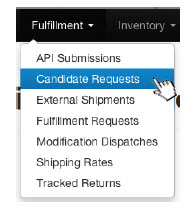
After logging into your account, select "Candidate Requests" from the "Fulfillment" Menu:
Now, we're ready to start entering information about the fulfillment request.
It's not required, but we recommend entering some kind of identifier into the "Merchant Identifier" field. This might be an order number from your e-commerce system, or just a note as to what it is—for example, "Samples for trade show". This will also help you identify the charge on your Shipvine bill.
You may need to enter a PO number for your customer. This PO number will show up on receipts, packing lists, and the shipping label. This field is also not required, but may help with bookkeeping or to satisfy shipping requirements for your customer.
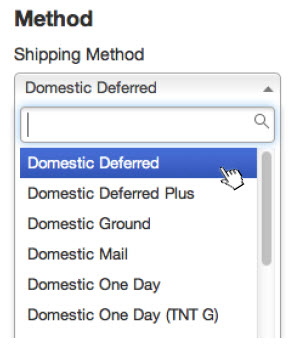
Next, pick a shipping method. For this example, we'll pick the cheapest option, which is "Domestic Deferred". This option instructs our system to pick the cheapest shipping method for this specific address. You can read more about all of the different shipping methods on our knowledge base. Shipvine can ship via USPS, UPS, Fedex, and DHL for your small package shipping.
Entering the Address and Items
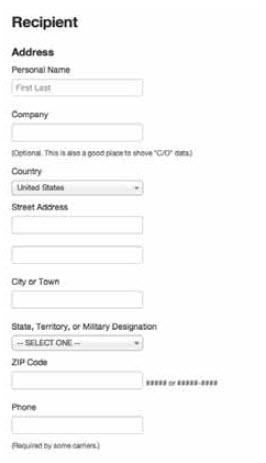
Now, you're ready to enter the address. Depending on the country, certain fields may not be displayed or required. Our system will automatically verify that your address is a valid address.
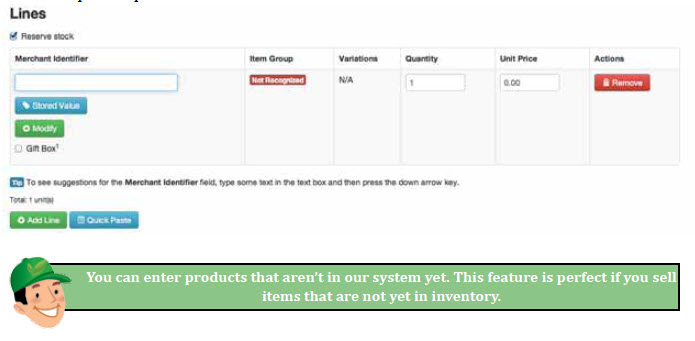
Now, you're ready to tell us what you want us to ship for you. In most cases, the merchant identifier will be your SKU number. Start typing the SKU number and press the down arrow to get a list of matching items.
After you select the item, enter the quantity you want to ship and the price. The price entered here will become the declared value of the shipment. For international shipments, this will be value upon which duties and taxes are calculated. Depending on the shipping method, this will also be the insurance value.
There are quite a few advanced options, but we'll just skip over those for now.
Totals and Saving
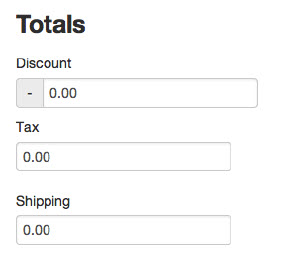
If you want to add an order-level discount, tax, or additional shipping charge to the total, enter it here, or just leave it at zero. These values will show up on any receipts that you select to have included, and it'll show up on international customs paperwork, too.
If everything looks good, press the "Save" button to process your request. This action will not ship your order, it simply saves the candidate request.
Submitting the Candidate Request
If you have no errors, then the system will display a green "Fulfill" button at the top of the page. When you press this button, the request will be processed and sent to the order picking queue to be picked, packed, and shipped. At this point, the candidate request is transformed into a fulfillment request.
Fixing Errors
If the system found something wrong with your request, scroll down the page until you see a yellow box displaying the "Fix This" error messages. The error will display the exact cause of the problem, informing you of what needs to be changed.
After you fix the problem, simply press the "Revalidate" button, and the system will try to process your request again. If it's successful, you'll see the green "Fulfill" button.
Related Articles
Integrating with Shipvine using EDI
What integration methods can I use with Shipvine? There are three ways to integrate your platform (i.e., get orders into and get tracking information and inventory numbers out of) Shipvine. Shipvine Sync Shipvine offers dozens of Shipvine-maintained, ...How to set up Shopify to work with Shipvine
This article applies to our legacy Shipvine Logistics portal and is not valid for our modern Shipvine Client Portal. It's easy to set up Shipvine to pull orders from your Shopify e-commerce store. We'll write back the tracking number and ...Onboarding with Shipvine
Onboarding with Shipvine Welcome to Shipvine! We're excited to work with as you grow your business and want to help you with that growth. We understand that moving your business to a new warehouse is stressful and impacts your business. We want to ...Add Insert to order
This article applies to our legacy Shipvine Logistics portal and is not valid for our modern Shipvine Client Portal. Do you need to add an existing insert to one of your orders? Follow these simple steps: 1. Select the candidate request you wish to ...Reports provided by Shipvine
This article applies to our legacy Shipvine Logistics portal and is not valid for our modern Shipvine Client Portal. Shipvine provides a wide array of reports that will compliment reporting from your e-commerce and/or other order management platform. ...